After some reflection, I've decided that one foot square tiles are the way to go. In 15mm scale each tile represents a good sized piece of terrain, and hopefully they should be relatively easy to pack away. Also, I was able to find precut styrofoam tiles on Ebay in this size easily, and for a good price. I've gone with 3/4" thick tiles because that is slightly taller than the figures.
Each terrain tile will consist of two thicknesses of styrofoam, making 1.5" high sides. That way I can cut trenches and craters into the top layer, and still have the ability for some tiles to make dugouts at an even lower level, or create extra deep recesses or even mine craters in no man's land. To make things easy on myself, I've decided to start with making no man's land tiles before attempting the more complicated task of making trenches.
In order to save materials, I decided that if a given tile doesn't include a feature that extends below the top layer, the bottom layer will not be a full sheet of styrofoam, but rather consist of "risers" that simply support and reinforce the top layer. When the plastic sides are added to the tile it should still be strong enough, and visually no different from a tile with two complete layers.
What follows is the process by which I made a tile featuring a small hill with shell holes spread around it. All gluing was done with a hot glue gun. This proved to be very useful stuff when working with styrofoam, because it dries quickly but not too quickly (unlike white glue) but doesn't dissolve the foam like super glue does. It's also strong and robust, not brittle. And it's inexpensive. All around good stuff. Obviously, one should be careful with it though. Extreme heat and stickiness are a potent combination.
Step 1: Here I have drawn a quick, rough outline of the space the hill will cover, and I've cut out some of the shell holes using a knife. I used the brims of a few different sizes of drinking cups as stencils for the holes.

Step 2: This is the under side of the tile. You can see I have added "risers" along the outside edges of the tile. These are just cut from one of the styrofoam panels I bought. The intention is that it will allow me to make more tiles than I otherwise would from the materials at hand, and save a little money. I also added one of the cut out pieces from the shell holes in the center of the tile as a support.

Step 3: I glued panels of cardboard to the under side of the shell holes. They will be built out with paper mache, so these panels will stop it from falling out the bottom.

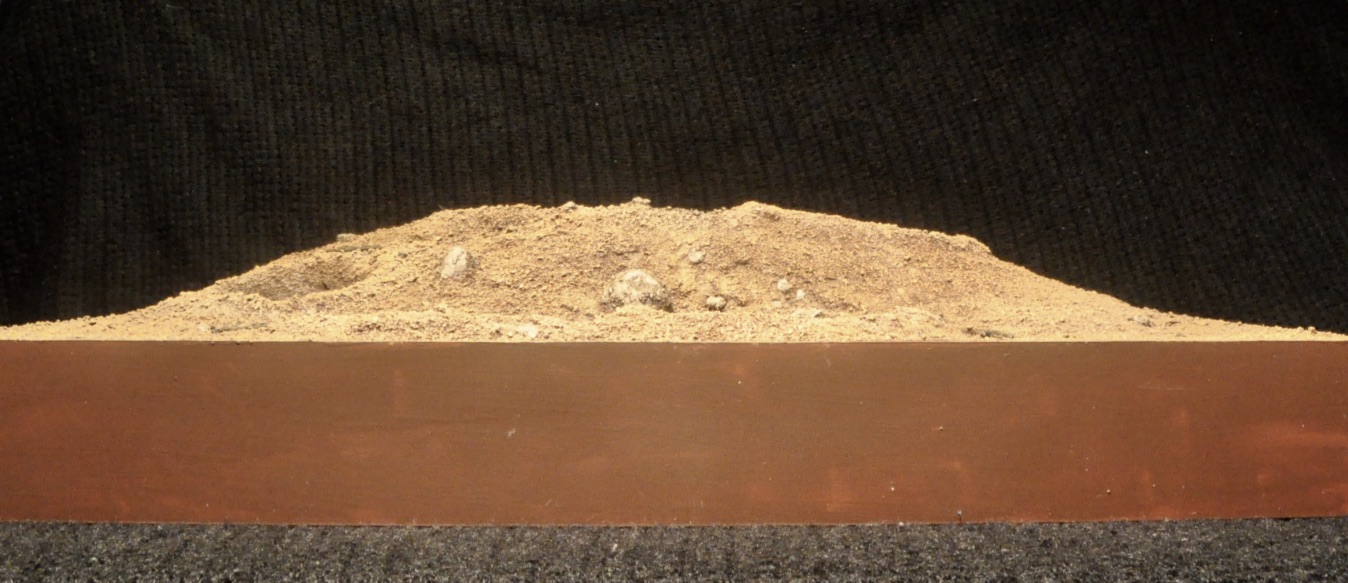
Step 4: Here is a view of the top of the tile. You can see how it sits on the risers. Also, I have added filler pieces of styrofoam in the area of the hill, so it does not have to be built up entirely with paper mache. That would make for a very thick mound of the stuff, which would take longer to dry.

Step 5: I've added plastic styrene panels to the sides of the tile. This gives it much more strength, and I hope will protect the edges from crumbling over time, so that the panels sit more neatly together. They are 1.5" tall, and slightly more than 12" in length, so that there are no gaps. I trim overhang with an exacto blade after they are secured.

Here is another view of the top where you can see the side panels in place, and the filler material for the hill.

Step 6: I've used Sculptamold to build up the hill and the shell holes. This is a sort of fine-ground paper mache powder to which you simply add water, stir and slop it on the base. It's easy to work with and easy to clean up, and it dries plenty strong enough for my purposes.
I fill the shell holes with the Sculptamold and then excavate them with my fingers, building up a little parapet around the rim. The hill was covered over with a generous amount of the stuff, and then I pressed the bottom of a round glass into it to make craters. I built those up too with my fingers. I formed a few uneven balls of Sculptamold to represent boulders thrown loose by the shells, and stuck those down on the surface.
(A note on craters: you have two competing interests here. On the one hand you want them to look realistic, which will generally mean rounded, like a ball was pressed in to the earth. On the other hand you want models to be able to sit nicely inside, which will mean a more flat bottom and straight sides, like a cylinder was pressed in. For my part, I've tried to aim for the middle ground, starting with a rounded shape and subtly flattening out bottom and sides to an extent. )
Note that I didn't bother to cover the whole tile with the paper mache. It's fine to have some flat, un-cratered spaces. In fact I will need some open spaces to add a few modular pieces on top, like shattered, burnt-up clumps of trees, a downed airplane, that sort of thing.

Here is a profile shot of the tile to show some of the relief.

And here is a close up of the surface so you can see the texture of the Sculptamold.

Step 7: After the Sculptamold is completely dry (a process that takes one to two days with an electric fan blowing over it, depending on thickness) I sprayed the tile with a generous coat of Woodland Scenics Scenic Cement and sprinkled a mixture of sand and fine gravel over the entire surface. After giving it a few minutes I turn it over to lightly shake off the excess (which I then gather to reuse). It's okay that the covering is not completely even.
I also add in a few larger pieces of gravel to represent larger rocks tossed loose by the explosions. I glue those on with Elmers white glue.

Step 8: Next the entire surface and sides are coated in brown paint - which takes a while, because it can be tricky getting in all the nooks and crannies created by the paper mache and the sand and gravel covering. I use Golden Acrylics brand Burnt Umber Light, which is available in large bottles from a local art supply store. You'll need a large volume of paint, and I would recommend against trying to make it go further by slightly diluting it. It will take more time and coverage to build up opacity, and if it is watered down too much it can loosen the glue that is holding the sand in place.
You can see I also added a few plastic tree stumps. These are Woodland Scenics tree armatures, cut up into irregular pieces and glued to the surface before the brown paint was applied.

After the base coat is throughly dry, I do a lot of dry-brushing with a palette of brows and tans. I go a little lighter around the edges of the craters so they stand out a little.
Rocks are painted a light gray, and then washed with Army Painter Strong Tone, a dark brown wash. Plastic tree bits get a few coats of the Strong Tone.
And here is the finished tile:


Here is another tile I did (my first "proof of concept" tile). This one doesn't have any added elevation, just craters.

Here you can see how the tiles join together.

And here is a low angle shot of the two of them so the elevation is apparent:

No sooner is the terrain prepared, than rival patrols are already trying to assert dominance over the ground.

That is pure genius! What a good idea and a great looking end result. Splendid!
ReplyDeleteThanks very much J Jackman, I'm glad you think they're coming out nicely. It's definitely more labor intensive than other options, but I think the final effect will be worth it.
DeleteI agree - absolutely fantastic. I'd love to give it a try at some stage. The terrain is very effective visually and looks very playable as well - a fine line to walk!
ReplyDeleteThanks Oswald, I would definitely recommend giving it a try. It takes some time, but it's not really tricky. I think it will be good for the games, and I'll post about that as soon as I manage to stage one.
Delete